やってみた:IBM Developer Develop a machine learning IoT app with Node-RED and TensorFlow.js
元記事
IBM Develoeprで公開されている「An easy, low-code way to incorporate AI capabilities into your devices – IBM Developer」をやってみました。 Raspberry Pi でNode-REDを用いて物体検出ができるはずですが.....。
結果
原因として考えられるものとして、Node-REDでRaspberry Pi のカメラモジュールを呼び出す「node-red-contrib-camerapi」ノードが直近2年間で更新されていないことが考えられます。 「node-red-contrib-camerapi」ノードの代わりの手段を実装することで動作させることが可能です。
配布されているサンプルを使用した場合
カメラ部分に「node-red-contrib-camerapi」ノードを使用します。エラーが起きます。エラー情報から見るに、「node-red-contrib-camerapi」ノードに問題があると思われます。

サンプルの一部を改修して使えるようにする
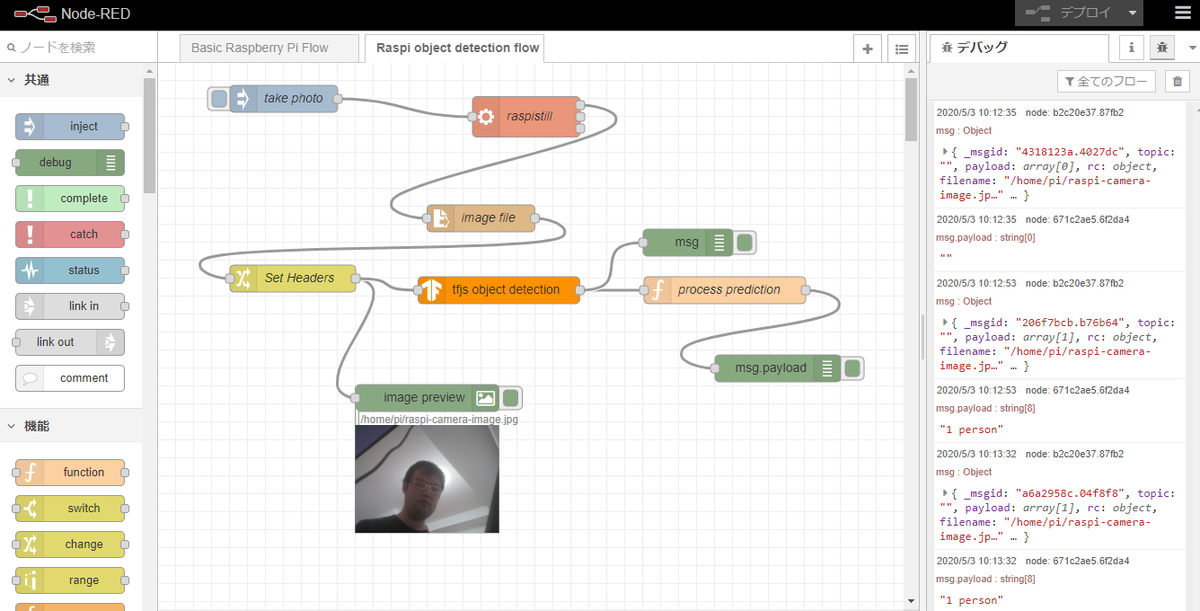
「node-red-contrib-camerapi」ノードの代わりに、execノード、file in ノード、switchノードで代替した場合
エラーが解決されました。サンプルとの違いは、「node-red-contrib-camerapi」ノードの代わりに、execノード、file in ノード、switchノードを使用しています。

代替手段で実装した場合のNode-RED フロー
[{"id":"6510a613.c5fc28","type":"tab","label":"Raspi object detection flow","disabled":false,"info":""},{"id":"b2c20e37.87fb2","type":"debug","z":"6510a613.c5fc28","name":"","active":true,"tosidebar":true,"console":false,"tostatus":false,"complete":"true","targetType":"full","x":590,"y":200,"wires":[]},{"id":"6f9d9422.b0711c","type":"function","z":"6510a613.c5fc28","name":"process prediction","func":"let a = []\n\nfor (let c in msg.classes) {\n a.push(`${msg.classes[c]} ${c}`)\n}\n\nmsg.payload = a.join(' and ')\n\nreturn msg;","outputs":1,"noerr":0,"x":630,"y":240,"wires":[["671c2ae5.6f2da4"]]},{"id":"1dd0defe.30c8a1","type":"file in","z":"6510a613.c5fc28","name":"image file","filename":"/home/pi/raspi-camera-image.jpg","format":"","chunk":false,"sendError":false,"encoding":"none","x":359.5,"y":173,"wires":[["37261ea3.c14952"]]},{"id":"7b8ac4d5.e4bf5c","type":"inject","z":"6510a613.c5fc28","name":"take photo","topic":"","payload":"","payloadType":"date","repeat":"","crontab":"","once":false,"onceDelay":0.1,"x":120,"y":80,"wires":[["ce750bf4.348ee8"]]},{"id":"37261ea3.c14952","type":"change","z":"6510a613.c5fc28","name":"Set Headers","rules":[{"t":"set","p":"headers","pt":"msg","to":"{}","tot":"json"},{"t":"set","p":"headers.content-type","pt":"msg","to":"image/jpeg","tot":"str"}],"action":"","property":"","from":"","to":"","reg":false,"x":150,"y":240,"wires":[["6152a65c.9b6238","19b4e4d7.9df4ab"]]},{"id":"6152a65c.9b6238","type":"image","z":"6510a613.c5fc28","name":"","width":160,"data":"payload","dataType":"msg","thumbnail":false,"active":true,"pass":false,"outputs":0,"x":299.5,"y":373,"wires":[]},{"id":"671c2ae5.6f2da4","type":"debug","z":"6510a613.c5fc28","name":"","active":true,"tosidebar":true,"console":false,"tostatus":false,"complete":"false","x":610,"y":300,"wires":[]},{"id":"ce750bf4.348ee8","type":"exec","z":"6510a613.c5fc28","command":"raspistill -o /home/pi/raspi-camera-image.jpg -rot 90 -w 320 -h 240","addpay":false,"append":"","useSpawn":"false","timer":"","oldrc":false,"name":"raspistill","x":300,"y":80,"wires":[["1dd0defe.30c8a1"],[],[]]},{"id":"19b4e4d7.9df4ab","type":"tfjs-object-detection","z":"6510a613.c5fc28","name":"","modelUrl":"","x":390,"y":240,"wires":[["6f9d9422.b0711c","b2c20e37.87fb2"]]}]
上記をNode-REDでインポート後、「tfjs object detection」ノードの直下に「■Model is Ready」と表示されたら、inject ノードのボタンをクリックしてobject detectionを実施できます。
Raspberry Pi 上のNode-REDに、「tfjs object detection」ノードを導入する手順
Raspberry Pi にNode-REDインストールしていない場合
OSはRaspbianを前提として、Raspberry Piで実行する : Node-RED日本ユーザ会 を参考に進めます。
Raspberry Pi に、「tfjs object detection」ノードを導入する
元記事で紹介されているサンプルのReadmeをもとに進めます。
リポジトリからクローン
$ git clone https://github.com/IBM/node-red-tensorflowjs
クローン先のパスを確認
$ cd node-red-tensorflowjs/
$ pwd
/home/pi/node-red-tensorflowjs
「tfjs-object-detection」ノードのインストール インストール時に、リポジトリをクローンした先のパスを含める必要があります。
$ cd ~/.node-red
$ npm install /home/pi/node-red-tensorflowjs/node-red-contrib-tfjs-object-detection
Raspberry Pi のカメラモジュールで撮影した画像をファイル確認するために、「image-output」ノードも追加します。
npm install node-red-contrib-image-output
Node-REDを再起動
sudo systemctl restart nodered.service
代替手段で実装した場合のNode-RED フローを、Raspberry Pi 上のNode-REDにインポートします。
「tfjs-object-detection」ノードで、model URL を入力しない場合は、標準モデルとして、オープンソースのcoco-ssd モデルを使用するようです。
まとめ
Tensorflow.js を用いて、Node-REDでobject detection(物体検出)を行うことができました。